So, last year, I planted some garlic. .
Some is probably an understatement. It was 24 cloves in a 10 X 5 plot. I dug them up, washed them, cured them, and ate them through about October.
This year, the garden is fallow, because of a new job and new baby, I have no time.
I went to check out how bad the weeds were. Lots of grass-like stalks were popping up.
Oh great, I thought. But then I looked closer. Sniffed. Dug up one and sniffed again.
Garlic shoots! Apparently I hadn’t been very diligent at getting all the garlic out last year. So, the cloves and bits of cloves that stayed over the winter were coming to life again.
Happy lazy gardener is happy.
Showing posts with label garlic. Show all posts
Showing posts with label garlic. Show all posts
Friday, April 13, 2012


Sunday, June 12, 2011
The week in garlic - ending June 12, 2011
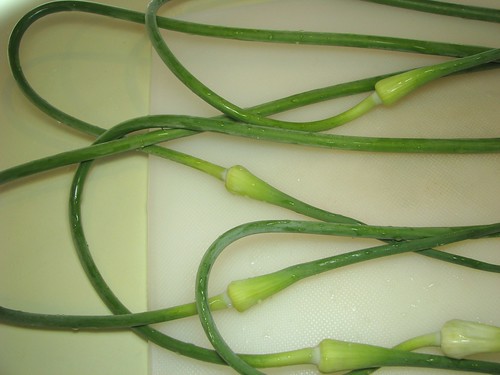
* I went out to weed my garden today, and I found a lovely surprise: The scapes are sprouting! Garlic scape pesto is mere days away.
* I was watching Chopped--don't judge me, and one of the basket ingredients was Black Garlic. This started out as a health food, but the trendy chefs found out about it and it's taken off as the must-have ingredient of the new decade. It appears to be a cross between roasted garlic and pickled garlic, where the whole heads are kept at high temperature, pressure, and humidity, until they turn black and (reportedly) tasty. When I can get my hands on some, I will report back. I have some very fun ideas how to use it. Stay tuned.
Sunday, October 31, 2010
Growing Garlic
Gorgeous fall day out today. My tomato plants are pretty much toast, so I decided to rip out the garden, and start again.
I'm growing garlic this time. It's in the dirt, covered with some convenient leaf mulch, each clove marked with a chopstick or piece of scrap wood.
I've got a ton of garlic from recent farmer's market trips, and I'm hoping that it will hold me over until my home-grown garlic is ready to harvest.
I'm not sure how well this will work out--our soil is very clay-heavy, and I've not grown garlic before. But if it does work out, I've got garlic scapes to look forward to in April.
I'm growing garlic this time. It's in the dirt, covered with some convenient leaf mulch, each clove marked with a chopstick or piece of scrap wood.
I've got a ton of garlic from recent farmer's market trips, and I'm hoping that it will hold me over until my home-grown garlic is ready to harvest.
I'm not sure how well this will work out--our soil is very clay-heavy, and I've not grown garlic before. But if it does work out, I've got garlic scapes to look forward to in April.
Thursday, April 16, 2009
M-m-m-my Samosas!
A few weeks ago, I had some pretty tasty samosas at a local restaurant, and was inspired to try making some myself.
The flavors seemed pretty straightforward: Mashed potato, cilantro, some coriander and curry powder. Nevertheless, I hit the library to find a basic samosa recipe I could adapt.
Mollie Katzen's Moosewood cookbook had samosa recipe that I used as a template. Because I was in a hurry (read: lazy), I used store-bought won ton wrappers and did not make my own dough.
I also baked my samosas, instead of frying them, to try to save a little bit of time and calories.
Measurements here are approximate, you'll want to taste your potato filling often and season it to your liking. If you use leftover mashed potatoes, make sure to add a little milk or other liquid, to get them smooth again.
M-m-m-my Samosas!
Ingredients:
Store-bought won ton wrappers
1 pound potatoes (russet's fine)
1 bunch cilantro
1 cup frozen peas
1/2 onion
2 cloves of garlic
1 tablespoon Curry powder (more or less to taste)
2 tablespoons oil
Non-stick cooking spray (like Pam)
1 teaspoon cumin
1 teaspoon coriander seeds
salt and pepper
Equipment:
Pizza cutter
Frying pan
pot for cooking potatoes
clean work surface
potato masher
Peel your potatoes. Chop them into medium pieces, toss them in some boiling salted water until they are cooked through, about 10-15 minutes. Drain, add a little bit of milk and mash until mostly smooth.
Meanwhile, while potatoes are cooking, chop your onions and garlic, crush the coriander seeds lightly. Add a little bit of oil to pan, fry onions and garlic with spices to bloom the spices, on low-medium heat, until onions are a bit soft and everything starts to smell awesome.
Take several springs of cilantro, but not the whole bunch, remove the center stems, and chop. Add onion mixture and cilantro to the potatoes. Taste, add additional salt, pepper, cilantro and spices as needed. While potato mixture is still hot, add the frozen peas, and stir gently. Try not to mash the peas.
Spray baking sheet with non-stick cooking spray, liberally. (this is important. I forgot this step and paid for it).
To fill: have a pizza cutter, a small bowl of water, and a clean work surface.
Cut wontons in half from corner to corner so you have two triangles. Make sure the top of the triangle is pointing up. Put a tablespoon or two of filling into wonton. Wet edges of wonton, With the top of the triangle pointing up, fold over wonton so edges meet symmetrically as best you can. Press wonton together to seal. If filling oozes out, then use less filling next time.
Put wontons on baking sheet. Spray tops of wontons with cooking spray. Cook for 5 minutes at 375 degrees, then turn over, check after another 5 minutes. They're done when they are golden brown but not burnt.
The flavors seemed pretty straightforward: Mashed potato, cilantro, some coriander and curry powder. Nevertheless, I hit the library to find a basic samosa recipe I could adapt.
Mollie Katzen's Moosewood cookbook had samosa recipe that I used as a template. Because I was in a hurry (read: lazy), I used store-bought won ton wrappers and did not make my own dough.
I also baked my samosas, instead of frying them, to try to save a little bit of time and calories.
Measurements here are approximate, you'll want to taste your potato filling often and season it to your liking. If you use leftover mashed potatoes, make sure to add a little milk or other liquid, to get them smooth again.
M-m-m-my Samosas!
Ingredients:
Store-bought won ton wrappers
1 pound potatoes (russet's fine)
1 bunch cilantro
1 cup frozen peas
1/2 onion
2 cloves of garlic
1 tablespoon Curry powder (more or less to taste)
2 tablespoons oil
Non-stick cooking spray (like Pam)
1 teaspoon cumin
1 teaspoon coriander seeds
salt and pepper
Equipment:
Pizza cutter
Frying pan
pot for cooking potatoes
clean work surface
potato masher
Peel your potatoes. Chop them into medium pieces, toss them in some boiling salted water until they are cooked through, about 10-15 minutes. Drain, add a little bit of milk and mash until mostly smooth.
Meanwhile, while potatoes are cooking, chop your onions and garlic, crush the coriander seeds lightly. Add a little bit of oil to pan, fry onions and garlic with spices to bloom the spices, on low-medium heat, until onions are a bit soft and everything starts to smell awesome.
Take several springs of cilantro, but not the whole bunch, remove the center stems, and chop. Add onion mixture and cilantro to the potatoes. Taste, add additional salt, pepper, cilantro and spices as needed. While potato mixture is still hot, add the frozen peas, and stir gently. Try not to mash the peas.
Spray baking sheet with non-stick cooking spray, liberally. (this is important. I forgot this step and paid for it).
To fill: have a pizza cutter, a small bowl of water, and a clean work surface.
Cut wontons in half from corner to corner so you have two triangles. Make sure the top of the triangle is pointing up. Put a tablespoon or two of filling into wonton. Wet edges of wonton, With the top of the triangle pointing up, fold over wonton so edges meet symmetrically as best you can. Press wonton together to seal. If filling oozes out, then use less filling next time.
Put wontons on baking sheet. Spray tops of wontons with cooking spray. Cook for 5 minutes at 375 degrees, then turn over, check after another 5 minutes. They're done when they are golden brown but not burnt.
Wednesday, September 3, 2008
Uses for Pesto, part 2
Update: Was on vacation in California. Food review of that trip forthcoming.
3. My garlic scape pesto is so concentrated with garlic flavoring that it's a great add-in when you need to, er, OK, I'll say it, kick it up a notch. Bonus: The scape pesto does not have a pronounced herby flavor like basil- or parsley-based pesto does.
I've used the pesto to enliven a bowl of canned tomato soup, to mix with sour cream for a chip dip, and as a topping for gaspacho.
4. Use it to make garlic bread.
5. Condiment for prime rib or other steak, instead of horseradish.
6. Add a little more olive oil, and use as green cocktail sauce.
It's good stuff. Next year, if you see those wierd curly-Q stalks at the farmer's market, dig out your food processor and give garlic scape pesto a try.
3. My garlic scape pesto is so concentrated with garlic flavoring that it's a great add-in when you need to, er, OK, I'll say it, kick it up a notch. Bonus: The scape pesto does not have a pronounced herby flavor like basil- or parsley-based pesto does.
I've used the pesto to enliven a bowl of canned tomato soup, to mix with sour cream for a chip dip, and as a topping for gaspacho.
4. Use it to make garlic bread.
5. Condiment for prime rib or other steak, instead of horseradish.
6. Add a little more olive oil, and use as green cocktail sauce.
It's good stuff. Next year, if you see those wierd curly-Q stalks at the farmer's market, dig out your food processor and give garlic scape pesto a try.
Thursday, August 7, 2008
Garlic Scape Pesto
The key to a really good pesto isn’t the freshness of the ingredients or the ratio of oil to nuts to cheese.
It’s a food processor.
Now, I’m sure that a large part of the reason that last night’s garlic scape pesto was so amazing was because the garlic scapes were locally and organically grown, the parmesan was real parmesan, and the olive oil was grown on a small family farm in Lebanon.
But the food processor was what allowed everything to come together quickly and homogeneously.
I tried to make pesto last year with my blender. Bad idea. The blades couldn’t stand up to the crunchy, chunky ingredients. And it made everything taste bitter. In fact, it was inedible, no matter how much parmesan I added into it at the end.
And as much as I like “slow” food, I wasn’t going to try the mortar and pestle.
If you’re going to make pesto, folks, a food processor is essential. Otherwise, don’t bother.
Now, onto the recipe.
Garlic Scape Pesto
A garlic scape is the shoot of a garlic plant which is cut off in early spring so that the garlic bulb will grow better. It’s kind of like a cross between a chive and a stalk of asparagus. It’s got a strong garlic flavor but is not as harsh as a clove of garlic. The scape season is pretty short, but they last pretty much forever if kept in the coldest part of your refrigerator.
A arge bunch of garlic scapes
about a cup of olive oil
salt and pepper, to taste
two large handfuls of almonds
1/2 cup (at least) grated Parmesan cheese
Cut the ends of the garlic scapes. Make sure to remove the flowering end to avoid bitterness. Roughly chop scapes into 2 inch pieces or so.
Add scapes, almonds, and 1/4 teaspoon of salt to food processor. Run processor until mixture is more or less uniform. While processor is running, drizzle in oil in a fine stream. Keep drizzling until the mixture starts to become more liquid and turns a lighter green in color. Stop the processor occasionally and check for thickness. Because the garlic scapes are tougher than, say, basil, this mixture will never be as smooth in texture as regular pesto. Add additional salt and pepper to taste. Fold in grated Parmesan. Keeps about a week in the coldest part of your refrigerator.
If freezing, don't add the cheese. Put into freezer-safe container, and add a little bit of oil to seal the top. After thawing, add the cheese just before serving. (Cheese doesn't do well being frozen).
Expect some pesto recipes from me the rest of the week. I've got about 2 cups of pesto to use up, so we'll see what I can do.
It’s a food processor.
Now, I’m sure that a large part of the reason that last night’s garlic scape pesto was so amazing was because the garlic scapes were locally and organically grown, the parmesan was real parmesan, and the olive oil was grown on a small family farm in Lebanon.
But the food processor was what allowed everything to come together quickly and homogeneously.
I tried to make pesto last year with my blender. Bad idea. The blades couldn’t stand up to the crunchy, chunky ingredients. And it made everything taste bitter. In fact, it was inedible, no matter how much parmesan I added into it at the end.
And as much as I like “slow” food, I wasn’t going to try the mortar and pestle.
If you’re going to make pesto, folks, a food processor is essential. Otherwise, don’t bother.
Now, onto the recipe.
Garlic Scape Pesto
A garlic scape is the shoot of a garlic plant which is cut off in early spring so that the garlic bulb will grow better. It’s kind of like a cross between a chive and a stalk of asparagus. It’s got a strong garlic flavor but is not as harsh as a clove of garlic. The scape season is pretty short, but they last pretty much forever if kept in the coldest part of your refrigerator.
A arge bunch of garlic scapes
about a cup of olive oil
salt and pepper, to taste
two large handfuls of almonds
1/2 cup (at least) grated Parmesan cheese
Cut the ends of the garlic scapes. Make sure to remove the flowering end to avoid bitterness. Roughly chop scapes into 2 inch pieces or so.
Add scapes, almonds, and 1/4 teaspoon of salt to food processor. Run processor until mixture is more or less uniform. While processor is running, drizzle in oil in a fine stream. Keep drizzling until the mixture starts to become more liquid and turns a lighter green in color. Stop the processor occasionally and check for thickness. Because the garlic scapes are tougher than, say, basil, this mixture will never be as smooth in texture as regular pesto. Add additional salt and pepper to taste. Fold in grated Parmesan. Keeps about a week in the coldest part of your refrigerator.
If freezing, don't add the cheese. Put into freezer-safe container, and add a little bit of oil to seal the top. After thawing, add the cheese just before serving. (Cheese doesn't do well being frozen).
Expect some pesto recipes from me the rest of the week. I've got about 2 cups of pesto to use up, so we'll see what I can do.
Thursday, October 25, 2007
Part 2 of How to use up 50 heads of garlic in 3 months
As promised.
Garlic soup – Toasting the bread before simmering it gives the soup a richer flavor. This is very soothing when you are sick, and surprisingly easy on the stomach. Serves 2.
Take some good bread, cube it. Saute it in a saucepan large enough to make some soup, with some olive oil and several whole peeled cloves of garlic. You want the bread toasted and crouton-y, and the cloves can get a little toasty too.
Add 2 cups of chicken broth, vegetable broth, or water. Simmer the soup for 15-20 minutes. Serve hot.
Chicken and cloves – Easiest recipe ever, and it always impresses. Serves 4.
Put 4 chicken breasts in baking dish, and season with salt, pepper, and herbs. Peel 4 to 5 heads of garlic completely. Cut off any woody or bruised areas. Add a lot of olive oil, enough to come up the baking dish at least a third. Scatter garlic around chicken, so that most cloves are in the olive oil, and some are on top of the chicken. Cover and cook at 350 degrees, for at least 30 minutes. (If you use frozen chicken, make it at least an hour). Serve with crusty bread on the side. Smoosh roasted garlic on bread and use bread to sop up the garlic oil.
If you are cooking this for more or less than 4 people, estimate 1 head of garlic, 1 boneless, skinless chicken breast, and at least 1/4 cup of olive oil per person.
Garlic Dill pickles – the recipe I use is Alton Brown’s refrigerator pickle recipe, with extra garlic and lots of fresh dill springs thrown in.
Parmesan garlic dip - A dip I first created because powdered parmesan doesn't get enough respect.
1 16 -ounce container sour cream
¼ cup mayonnaise
¼ c. Parmesan cheese (the powdery kind from the green shaker)
1 clove garlic, minced finely
1 teaspoon salt
white pepper to taste
Mix all ingredients. Refrigerate. Serve with crackers and a bag of pre-mixed, pre-cut vegetables. This dip is especially good with snow peas.
Chocolate covered garlic – this isn’t as strange as it sounds, really. Then again, it’s not a recipe for everybody…because most people are too chicken to try it. The garlic is poached in wine, sugar, and spices, which makes it very mellow and sweet. It’s really not all that different than eating a chocolate-covered cherry, or a pretzel.
Since this recipe is originally from The Garlic Book, I can’t really post it without permission. However, since it’s apparently out of print, I will give the general procedure and ingredients for the recipe.
Peel a head of garlic. Simmer cloves in wine, sugar, lemon peel and spices, until soft. As cloves are cooling, melt a high quality melting chocolate. Dip cloves in chocolate using a toothpick, and lots of waxed paper to keep the mess down. Sore on waxed paper in a sealed container. These do not keep well, so eat within a day.
Garlic soup – Toasting the bread before simmering it gives the soup a richer flavor. This is very soothing when you are sick, and surprisingly easy on the stomach. Serves 2.
Take some good bread, cube it. Saute it in a saucepan large enough to make some soup, with some olive oil and several whole peeled cloves of garlic. You want the bread toasted and crouton-y, and the cloves can get a little toasty too.
Add 2 cups of chicken broth, vegetable broth, or water. Simmer the soup for 15-20 minutes. Serve hot.
Chicken and cloves – Easiest recipe ever, and it always impresses. Serves 4.
Put 4 chicken breasts in baking dish, and season with salt, pepper, and herbs. Peel 4 to 5 heads of garlic completely. Cut off any woody or bruised areas. Add a lot of olive oil, enough to come up the baking dish at least a third. Scatter garlic around chicken, so that most cloves are in the olive oil, and some are on top of the chicken. Cover and cook at 350 degrees, for at least 30 minutes. (If you use frozen chicken, make it at least an hour). Serve with crusty bread on the side. Smoosh roasted garlic on bread and use bread to sop up the garlic oil.
If you are cooking this for more or less than 4 people, estimate 1 head of garlic, 1 boneless, skinless chicken breast, and at least 1/4 cup of olive oil per person.
Garlic Dill pickles – the recipe I use is Alton Brown’s refrigerator pickle recipe, with extra garlic and lots of fresh dill springs thrown in.
Parmesan garlic dip - A dip I first created because powdered parmesan doesn't get enough respect.
1 16 -ounce container sour cream
¼ cup mayonnaise
¼ c. Parmesan cheese (the powdery kind from the green shaker)
1 clove garlic, minced finely
1 teaspoon salt
white pepper to taste
Mix all ingredients. Refrigerate. Serve with crackers and a bag of pre-mixed, pre-cut vegetables. This dip is especially good with snow peas.
Chocolate covered garlic – this isn’t as strange as it sounds, really. Then again, it’s not a recipe for everybody…because most people are too chicken to try it. The garlic is poached in wine, sugar, and spices, which makes it very mellow and sweet. It’s really not all that different than eating a chocolate-covered cherry, or a pretzel.
Since this recipe is originally from The Garlic Book, I can’t really post it without permission. However, since it’s apparently out of print, I will give the general procedure and ingredients for the recipe.
Peel a head of garlic. Simmer cloves in wine, sugar, lemon peel and spices, until soft. As cloves are cooling, melt a high quality melting chocolate. Dip cloves in chocolate using a toothpick, and lots of waxed paper to keep the mess down. Sore on waxed paper in a sealed container. These do not keep well, so eat within a day.
How to use up 50 heads of garlic in 3 months
To those of you who have complained that there's a dearth of garlic on this blog (which being named "Garlic is Love," should really have more garlic), I offer this post:
We had an Iron Chef party in June for my friend's birthday. We were given three options on what the secret ingredient might be, and it turned out to be "Battle Garlic." (Woo-hoo!) I won, but only by one point (a very close battle indeed).
The Chairman, the birthday girl's husband, wanted to dramatically rip the cover off the theme ingredients to reveal them, just like they do on the show. Which he did, by buying about 50 heads of garlic.
As the two chefs cooked, it slowly dawned on the "Chairman" that he had bought way too much garlic (The boy doesn't cook much). Even with my dishes of individual roasted garlic, we went through fewer than a half a dozen of the heads.
Oops.
We wound up splitting the difference, and I went home with about 25 heads of baby garlic, mexican garlic, and elephant garlic (which is actually a leek).
Thus, why I scrambled to find new ways to use up the leftover garlic this past summer.
Here's what I came up with:
* Anytime I was sauteeing anything, I added one clove of minced garlic. (1 clove per recipe)
* I made lots of dips that use a lot of garlic, like tsati..tzaz...cucumber garlic dip...onion dip with garlic, herb dip with garlic, hummus, and so on. (1-2 cloves per recipe)
* Garlic bread (1-2 cloves per recipe)
* Garlic dill pickles. (4-5 cloves per jar)
* Garlic soup. (1 HEAD per recipe)
* Chocolate covered garlic--no, wait, no one lets me cook that anymore... (1-2 HEADS of garlic per recipe, theoretically)
And, the mother of all garlic dishes when you have a ton of garlic...
* Chicken and 40 cloves of garlic (4-5 HEADS per recipe!!)
Armed with this phalanx of garlic recipes, I got through 25 heads before Labor Day, and even found myself using so much garlic that I had to go out and get a bunch of fresh stuff in bulk at the farmer's market.
I'll post the recipes separately.
We had an Iron Chef party in June for my friend's birthday. We were given three options on what the secret ingredient might be, and it turned out to be "Battle Garlic." (Woo-hoo!) I won, but only by one point (a very close battle indeed).
The Chairman, the birthday girl's husband, wanted to dramatically rip the cover off the theme ingredients to reveal them, just like they do on the show. Which he did, by buying about 50 heads of garlic.
As the two chefs cooked, it slowly dawned on the "Chairman" that he had bought way too much garlic (The boy doesn't cook much). Even with my dishes of individual roasted garlic, we went through fewer than a half a dozen of the heads.
Oops.
We wound up splitting the difference, and I went home with about 25 heads of baby garlic, mexican garlic, and elephant garlic (which is actually a leek).
Thus, why I scrambled to find new ways to use up the leftover garlic this past summer.
Here's what I came up with:
* Anytime I was sauteeing anything, I added one clove of minced garlic. (1 clove per recipe)
* I made lots of dips that use a lot of garlic, like tsati..tzaz...cucumber garlic dip...onion dip with garlic, herb dip with garlic, hummus, and so on. (1-2 cloves per recipe)
* Garlic bread (1-2 cloves per recipe)
* Garlic dill pickles. (4-5 cloves per jar)
* Garlic soup. (1 HEAD per recipe)
* Chocolate covered garlic--no, wait, no one lets me cook that anymore... (1-2 HEADS of garlic per recipe, theoretically)
And, the mother of all garlic dishes when you have a ton of garlic...
* Chicken and 40 cloves of garlic (4-5 HEADS per recipe!!)
Armed with this phalanx of garlic recipes, I got through 25 heads before Labor Day, and even found myself using so much garlic that I had to go out and get a bunch of fresh stuff in bulk at the farmer's market.
I'll post the recipes separately.
Monday, October 22, 2007
Last week of my farm share :(
Today was the last day for the weekly farm share, which I've been participating in since early Spring. For about $15 a week, I got between 5 and 15 items freshly and organically grown on a farm within 25 miles from me.
The farm share is also known as CSA, which stands for Community Supported Agricultrue. I like "farm share" better, because it needs less explaining. We are a family of two, so I got a half share.
The experience was pretty good. It definitely got my husband and I to eat more veggies, and I was able to use nearly all of the produce I recieved without it spoiling. There were a couple squash that I let sit too long, and some swiss chard, and that was pretty much it.
It was, at times, hard to tell if I was getting my money's worth from the CSA, especially with the early season being droughty and the late season being floody, the reverse of what is ideal for farming. But, overall, it was a great experience, and I'll probably do it again. It did mean that a lot of days, I had to cook even if I didn't want to, or else my produce would spoil.
I'm lucky that there are several CSA's in my area, and I think next year I'll try a different one to see if I like it any better. After I've shopped around a bit, then I'll pick the one I like best.
If you are wanting to get into the local food thing, and you enjoy cooking on a daily basis, I highly recommend CSA's as a good way to start. And the fresh garlic that I got was very, very nice.
Look for a longer post about local food sometime soon--meat and veggies.
The farm share is also known as CSA, which stands for Community Supported Agricultrue. I like "farm share" better, because it needs less explaining. We are a family of two, so I got a half share.
The experience was pretty good. It definitely got my husband and I to eat more veggies, and I was able to use nearly all of the produce I recieved without it spoiling. There were a couple squash that I let sit too long, and some swiss chard, and that was pretty much it.
It was, at times, hard to tell if I was getting my money's worth from the CSA, especially with the early season being droughty and the late season being floody, the reverse of what is ideal for farming. But, overall, it was a great experience, and I'll probably do it again. It did mean that a lot of days, I had to cook even if I didn't want to, or else my produce would spoil.
I'm lucky that there are several CSA's in my area, and I think next year I'll try a different one to see if I like it any better. After I've shopped around a bit, then I'll pick the one I like best.
If you are wanting to get into the local food thing, and you enjoy cooking on a daily basis, I highly recommend CSA's as a good way to start. And the fresh garlic that I got was very, very nice.
Look for a longer post about local food sometime soon--meat and veggies.
Subscribe to:
Posts (Atom)
